Thursday, March 23, 2017

CloudWatch DataAlreadyAcceptedException issue

The Problem:

We recently started using AWS Cloud Watch Agent for uploading logs for a few of our NodeJS processes. Soon after our initial move we began to notice that logs were not been uploaded for the majority of the processes.

Debugging Process:
In order to debug the issue further we began by looking at the CloudWatch agent logs located in the var/log directory.

We noticed the following logs in the /var/log/awslog.log:

2017-03-24 05:32:48,758 - cwlogs.push.publisher - WARNING - 14818 - Thread-5 - Caught exception: An error occurred (DataAlreadyAcceptedException) when calling the PutLogEvents operation: The given batch of log events has already been accepted. The next batch can be sent with sequenceToken: 49567766878003081255417777553615842777473923345314516562


The cause of DataAlreadyAcceptedException is a bit vague:

The event was already logged.


However, reading about the component which throws this exception gives an inkling of the cause [2]. The exception is thrown by the PutLogEvents API. The official documentation [1] lists the following conditions under which a log may fail to upload:

 - The maximum batch size is 1,048,576 bytes, and this size is calculated as the sum of all event messages in UTF-8, plus 26 bytes for each log event.
 - None of the log events in the batch can be more than 2 hours in the future.
 - None of the log events in the batch can be older than 14 days or the retention period of the log group.
 - The log events in the batch must be in chronological ordered by their timestamp (the time the event occurred, expressed as the number of milliseconds since Jan 1, 1970 00:00:00 UTC).
 - The maximum number of log events in a batch is 10,000.
 - A batch of log events in a single request cannot span more than 24 hours. Otherwise, the operation fails.

In our case logs which failed to upload met all criteria except the following:


 A batch of log events in a single request cannot span more than 24 hours. Otherwise, the operation fails.


Oddly enough this was preventing even current logs from been uploaded to CloudWatch.

Solution:

The state of the AWS CloudWatch agent is maintained in a file defined in the CloudWatch configuration file.

In our case the state file was defined in our cwlogs.cfg file was:

/var/awslogs/state/agent-state


In order to force the CloudWatch Agent to force upload the logs we deleted the state file.


References

[1] http://docs.aws.amazon.com/AmazonCloudWatchLogs/latest/APIReference/API_PutLogEvents.html
[2] http://docs.aws.amazon.com/AmazonCloudWatchLogs/latest/APIReference/API_PutLogEvents.html#API_PutLogEvents_Errors
[2] CloudWatch Agent Reference, http://docs.aws.amazon.com/AmazonCloudWatch/latest/logs/AgentReference.html
[3] CloudWatch Agent start command, http://docs.aws.amazon.com/AmazonCloudWatch/latest/logs/StartTheCWLAgent.html
[4] CloudWatch Agent stop command, http://docs.aws.amazon.com/AmazonCloudWatch/latest/logs/StopTheCWLAgent.html
[5] CloudWatch Agent status command, http://docs.aws.amazon.com/AmazonCloudWatch/latest/logs/ReportCWLAgentStatus.html

Tuesday, October 4, 2016

Adding a custom list order to asset types


Introduction

This brief tutorial will provide a set of instructions to reorganize the order in which the icons appear in the WSO2 Enterprise Store . The tutorial will illustrate the steps for achieving this goal in the Store application. Our goal is to add a new asset type and get it to appear as the first entry in the asset type navigation menu as shown below:


A deploy-able sample with all the necessary resources is available here [1] . The content of this tutorial is valid for WSO2 Enterprise Store 2.1.0.

How are the icons rendered?

The list of available assets is populated using two page decorators (both called navigationBar) :
  1. In the app extension, https://github.com/wso2/carbon-store/blob/master/apps/store/extensions/app/store-common/app.js#L122 
  2. In the default asset extension, https://github.com/wso2/carbon-store/blob/master/apps/store/extensions/assets/default/asset.js#L223
In both cases a single bit of logic is invoked:

The implementation of  the navigationBar page decorator can be viewed here.


The above snippet of code iterates through all of the available asset types and builds an array which is used to render the asset icons. In order to control the order we will be writing a new page decorator which will be invoked by both application and asset pages.

Changing the order of the asset types

We will need to introduce a new page decorator to alter the order of the assets.The new decorator defines a list of predefined asset types as shown below:


Important: When you define new asset types you will need to modify the hard coded list of asset types

The above snippet of code is defined in the decorators.js located here. The key change is located at line 16 where the UI activated asset type list is replaced with a hard coded list of values to reflect the order depicted in the original screenshot.

Once the new decorator is written we will need to wire it up by adding a new default asset extension and by changing the decorator used to populate asset types for global pages.

Affecting changes to the asset pages


In order to affect changes to the icon list that appears in the asset pages we can deploy an asset extension which will modify the default asset behaviour (the order of icons in this case).


This is packaged as an app extension and is available here. The instructions for deploying the app extension is described in the README.md of the repo.To summarize, you will need to:
  1. Stop the running WSO2 Enterprise Store Server
  2. Copy the mycustom-store folder to the {CARBON_HOME}/repository/deployment/server/jaggeryapps/store/extensions/app directory
  3. Restart the WSO2 Enterprise Store Server

Affecting changes to the Top Assets page


In order to affect changes to the icon list in global pages such as the top-assets page we will need to directly modify the navigationBar decorator defined in the store-common app extension  here [2].


Done!

To view these changes navigate to the WSO2 ES Store application: https://localhost:9443/store


References


[1] https://github.com/splinter/es-menu-sample
[2] https://github.com/wso2/carbon-store/blob/master/apps/store/extensions/app/store-common/app.js#L122

Wednesday, August 31, 2016

How to extend an asset's store view in WSO2 GREG 5.3.0

This blog post is an amendment to Niranjan's blog post [1] on the same topic. The blog post while correct needs to be updated for G-REG 5.3.0 as there have been several minor changes to the templates. A set of ready to use templates with updated changes can be found here [2]

I will first summarize the steps performed by Niranjan:

  1. The default implementation of the details page in the Store application does not display all of the attributes visible in the Publisher. One important factor behind the decision to reduced information is that some of the data such as endpoints are not in a format which is easily digestible by templates
  2. In order to rectify this Niranjan has introduced the jsonFormatter method which converts these hard to digest attributes into a format easily consumed by templates.
  3. To display the information he has introduced several new templates which mirror the information in the Publisher [3]
The release of G-REG 5.3.0 has necessitated several changes to the above steps:
  1. Alterations to the overview.hbs (Notice that . has been replaced with assets)
  2. Omitting the  asset-attributes.hbs
  3. Adding rows to the doclinks template
EDIT: A colleague (Chandana Napagoda) has pointed out an issue in the doclinks template.This has now been corrected in the git repo.

Reference
[1] http://niranjankaru.blogspot.com/2016/02/how-to-extend-assets-store-view-in-wso2.html
[2] https://github.com/splinter/greg-tutorial-1/tree/master

Sunday, August 14, 2016

Destructuring in ES2015

This is a first in a series of blog posts that will chronicle my exploration of the ECMA Script 2015 language update. The ES2015 is a specification which updates JavaScript with several additions to the language syntax. These improvements fall under the broad umbrella of ECMA Script 6 (ES6).

Why now?

I recently started working on a hobby project involving React and React Native which contain a lot of examples written in ES6.Hence, I thaught I would kill two birds with one stone and learn a bit about ES6 language features.

Important: I am in no ways a JS language expert and these blogs are a self learning tool (Caveat Emptor!)

What is Destructuring?

The process of extracting values from an object or an array [1]. It allows you to write concise code by:
  1. More cleanly handling functions which return multiple values
  2. More concisely access nested properties in objects

The syntax for destructuring in ES6 changes based on whether your working with an object or an array(Refer to Case#1 and Case#2 in the example below).

JS Sample on JSBIN 


When destructuring an Object JS will call toObject method on the left side of the expression.Hence, attempting to destructure undefined or null will cause an exception [1] [2].This means that primitives can be destructured too! (Refer to Case#5)

Loads of examples can be found here [4] and here [5].

I will be updating this post with more info once I get a bit of practice with this new syntax.

References


[1] http://exploringjs.com/es6/ch_destructuring.html
[2] http://www.ecma-international.org/ecma-262/6.0/#sec-toobject
[3] https://babeljs.io/docs/learn-es2015/
[4] https://ponyfoo.com/articles/es6-destructuring-in-depth
[5] https://gist.github.com/mikaelbr/9900818

Wednesday, August 10, 2016

Enabling Taxonomies for Content Type RXTs


The Problem
Those who have tried out the G-REG 5.3.0 will notice that content type RXTs strangely do not have a way for users to categorize assets using Taxonomies.The list of affected RXTs include:

  • Swagger
  • WSDL
  • WADL
  • Policy
  • Schema
Although, there is currently no way to enable this functionality at creation time (short of writing a custom create page), it is possible to access this feature using the edit page. However, we run into another hurdle as the edit page is not present for content type RXTs.


The Solution
It is thankfully not that hard to enable the update page.The Enterprise Store (ES) Extension framework auto generates create, update and delete pages for all the asset types deployed to the G-REG server.Hence, we just need to enable the update button and the ES will take care of rendering the page for us.This auto generated page


The bit of code which hides the edit page is shown below (swagger/asset.js) [1] :

The above snippet of code is present in each of the content type asset extensions:

  • <CARBON_HOME>/repository/deployment/server/jaggeryapps/publisher/extensions/assets/swagger/asset.js
  • <CARBON_HOME>/repository/deployment/server/jaggeryapps/publisher/extensions/assets/wsdl/asset.js
  • <CARBON_HOME>/repository/deployment/server/jaggeryapps/publisher/extensions/assets/wadl/asset.js
  • <CARBON_HOME>/repository/deployment/server/jaggeryapps/publisher/extensions/assets/policy/asset.js
  • <CARBON_HOME>/repository/deployment/server/jaggeryapps/publisher/extensions/assets/schema/asset.js
In order to enable to the update button comment out the following bit of code:


You should now be able presented with the update button and the update page:


The update page with the Taxonomy:


References
[1] https://github.com/wso2/product-greg/blob/v5.3.0-rc2/modules/es-extensions/publisher/asset/swagger/asset.js#L352

Friday, July 8, 2016

Customizing the subscription text in the WSO2 Enterprise Store 2.1.0

This short tutorial will focus on the process of customizing the subscription text which appears when a user subscribes to a given asset instance.

The complete set of resources utilized in this tutorial can be accessed here [1] .


Prerequisites

  • WSO2 Enterprise Store 2.1.0 (Pending a public release)


Our Goal

We will define a new Application Registry Extension file and change the text which appears when a user subscribes to an asset instance.


How can we achieve this goal?

The Enterprise Store Extension framework provides for individual sections of a page (referred to as partials) to be overridden by asset types.In this case the subscription text is controlled by the following partials:
  1. process-asset-text.hbs
  2. processed-asset-text.hbs


Step 1 : Defining  new partials


Alter the process-asset-text.hbs:


Alter the processed-asset-text.hbs:


What is the data-process tag?

The data-process defines text which will be displayed while the asset is been subscribed.

What is the data-success tag?

The data-success tag defines the text of the message which appears after successfully subscribing to an asset.

What is the data-error tag?

The data-error tag defines the text of the message which appears  if the subscription process fails.

What if I want more control over the client side behaviour?

The client side behaviour is controlled by the asset-core.js available here [3] .


Step 2 : Deploying the new partials

In order to deploy the above partials to the Store we will need to create an asset extension [2]. A completed asset extension  is available here [1].


Step 3 : Restart the server


Final Result

The final result of the above changes will be visible in the asset details page


References

[1] https://github.com/splinter/es-tutorial-3
[2] https://github.com/splinter/es-tutorial-3/tree/master/applications/themes/store/partials
[3] https://github.com/wso2/carbon-store/blob/master/apps/store/themes/store/js/asset-core.js

Sunday, July 3, 2016

File type fields and RXTs

The focus of the tutorial will be to utilize the File type field capabilities of the Enterprise Store extension framework to store a simple csv file with an asset.

For the sake of brevity I have not included the steps needed to display the download links in the Governance Center Store.This tutorial deals primarily with the alterations needed for the Publisher UI.

The complete set of resources used in this tutorial can be accessed here[2].

Prerequisites


  • WSO2 Governance Registry 5.2.0

Our Goal

We will define an Applications asset type that we allow a user to upload a test plan when the application is created in the Governance Center Publisher.

How can we achieve this goal?

  1. Define a field as a file field to store the test plan
  2. Provide a link to download the file

Where will the file be stored?

Any fields that have been marked as a file field will have the contents of the file stored in the registry and referenced via the field name.

How are file served?

The files are served through a storage controller [1] which utilizes a combination of asset type, asset Id and the field name to access and serve the file from the registry.

What file types are supported?

The number of supported file types is relegated to those defined in a map here [7] , however this can be increased by adding more types to previously mentioned map.

Step 1: Define a field as a file field

For this tutorial we will be utilizing the applications asset type which is available in the companion git repository here [3] .

In order to support the test plan to be uploaded with the asset we will create a new table for Tests and define a field named plan that will be used to store the test plan file. However, at this point we run into a major issue: the RXT schema does not support file type fields. 

What can we do?

The Governance Registry Extension file schema does not provide  a means to define a file field type.This is achieved through a mechanism in the Enterprise Store extension framework which enriches the field types list.

In the RXT definition we will simply define the plan field as a text field (as far the  Governance Registry is concerned there is no concept of a file field type):


To define the field as a file type we will create an asset extension [4] which will alter the behaviour of the plans text field. In the asset.js file we define the following configuration to achieve this change [5]:


When this extension is deployed it will override the field type from text  to file. It is important to note that the concept of a file field type exsists only within the context of the Governance Center Publisher and Store applications.

Step 2: Provide  a link to download the file


We will need to alter the view template (defined as a Handlebars template file)  in order to provide a download link to the file:


The download link is a dynamic URL of the following form:

/storage/{{type}}/{{id}}/{file_field_name}

Example


https://172.17.0.1:9443/publisher/storage/applications/1c71ae62-7325-4ad0-85f7-25faa80ebf25/tests_plan


  • type: The asset type (e.g. applications)
  • id: The asset id (e.g. 1c71ae62-7325-4ad0-85f7-25faa80ebf25)
  • file_field_name: The name of the file field (e.g. tests_plan)


Step 3: Restart the server

Final Result


When you restart the server you should see the applications asset type in the type list:


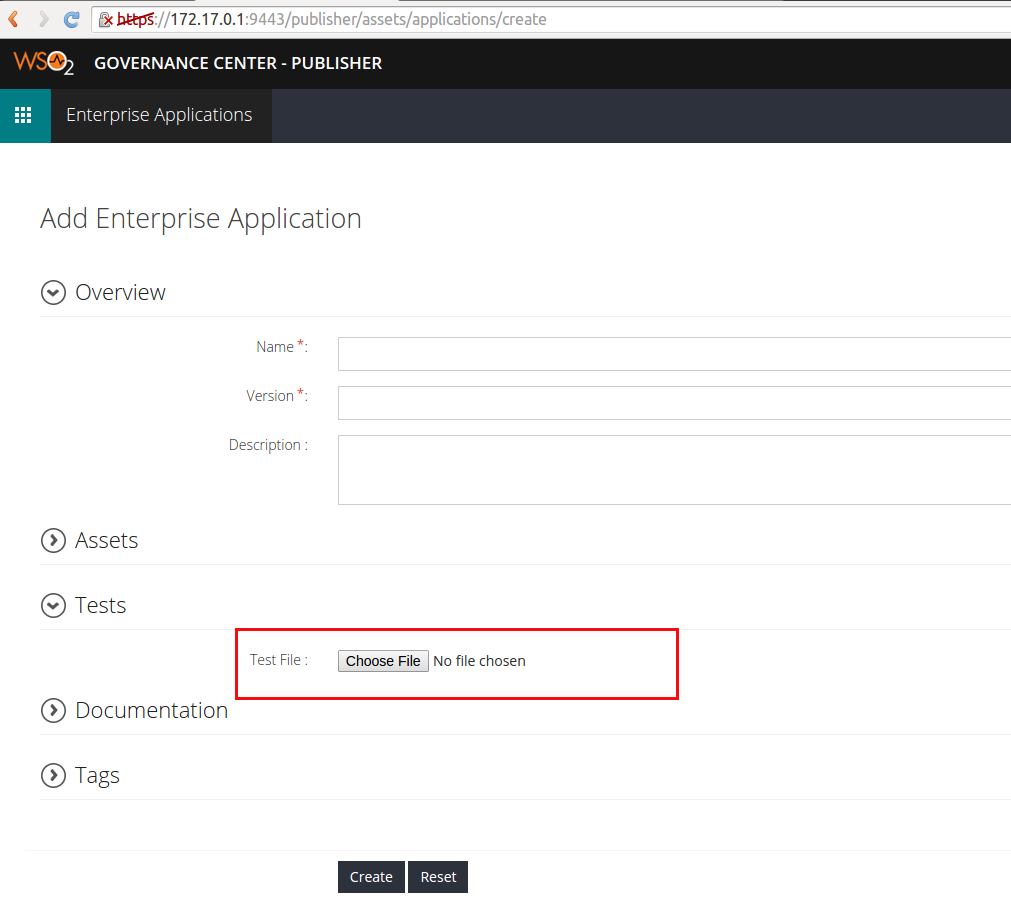
In the applications create page you will be presented with a file browser:

After the asset is created the download link will appear in the asset details page:


References
[1] https://github.com/wso2/carbon-store/blob/master/apps/publisher/controllers/storage-router.jag
[2] https://github.com/splinter/es-tutorial-2
[3] https://github.com/splinter/es-tutorial-2/blob/master/applications.rxt
[4] https://github.com/splinter/es-tutorial-2/tree/master/applications
[5] https://github.com/splinter/es-tutorial-2/blob/master/applications/asset.js
[7] https://github.com/wso2/carbon-store/blob/master/jaggery-modules/utils/module/scripts/file/file.js#L22